Do What You Pin: Roasted Artichokes

I remember the first time I encountered whole artichokes. I was at dinner at a close friend’s parent’s house, and I mistakenly tried to eat the entire leaf. I felt quite embarrassed at the time, but it’s been over five years since that experience, and I’ve never been served another whole artichoke, so I suppose the rarity of the dish could account for some of my confusion.

When I came across this tutorial for roasted artichokes at Pinch My Salt, knew it was something I wanted to try. I’m always looking for new side dish options, and vegetable sides are especially important during my Whole30, when I can’t fill a third of my plate with a grain.

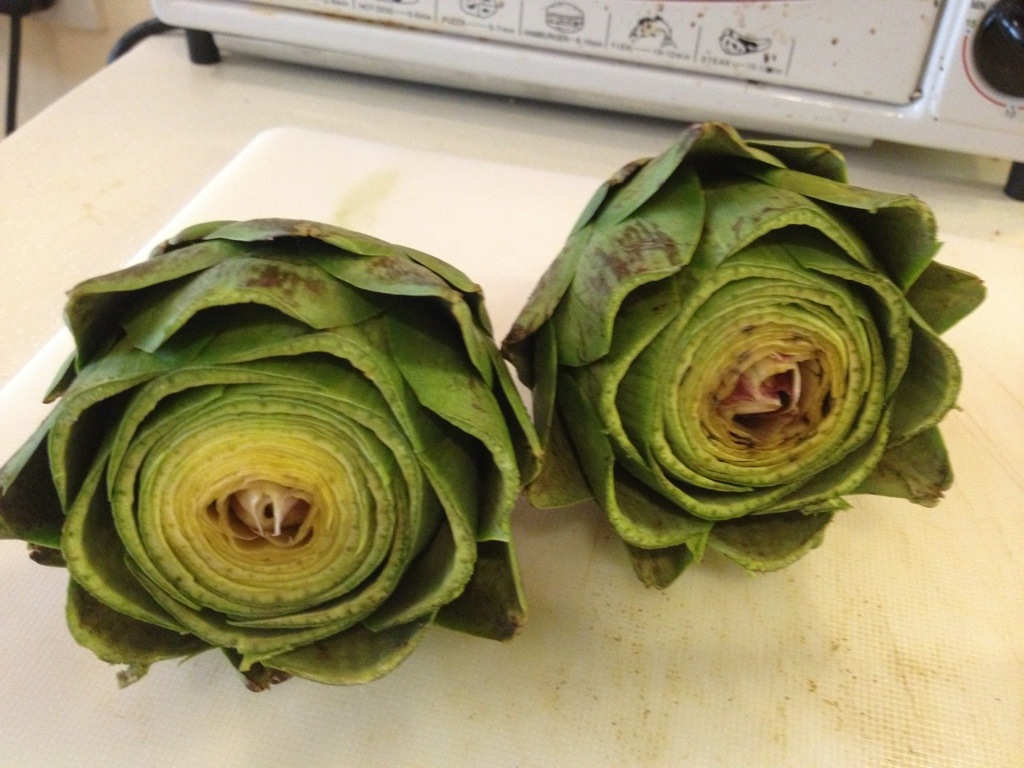
Here’s what I started with:

20130707-154709.jpg
I cut off the top third of the artichokes…

20130707-154821.jpg
…and the stems…

20130707-154905.jpg
…and stuffed them with garlic cloves. I then drizzled lemon juice, olive oil, and salt over the artichokes and wrapped them in tin foil smeared with more olive oil.

20130707-155109.jpg
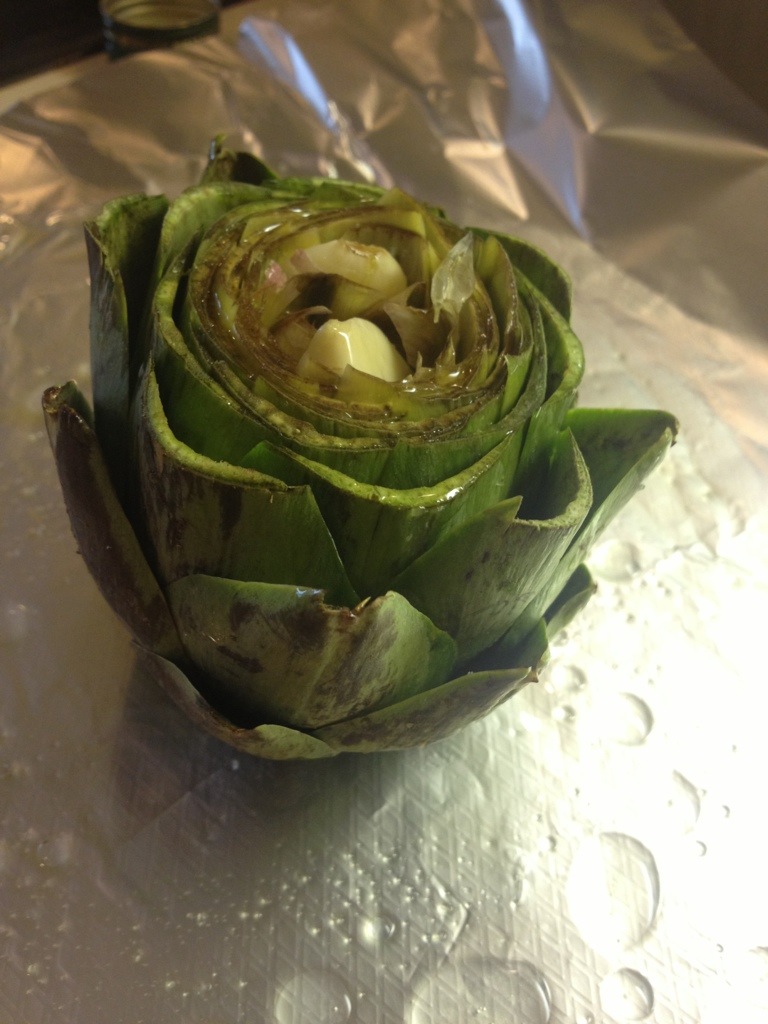
Into the oven they go!

20130707-155153.jpg
I cooked them for an hour and they came out PERFECTLY.

20130707-155334.jpg
I’ve only had whole artichokes twice in my life, but these were the best ones I’ve ever had. The hearts were indescribably delicious. And eating the roasted cloves of garlic cooked in the center wasn’t a chore either. 🙂

20130707-155612.jpg
I’ll definitely be serving these the next time I cook for my family or friends. Such a great food for a dinner party! Check out Pinch My Salt for a great tutorial to make your own!

Southern Style Grits with Bacon

My siblings and I have been enjoying some great restaurants, but one of my favorite parts of their visit has been cooking breakfast for them! On their first morning I made scrambled eggs and smoothies and yesterday I made oatmeal with banana, blueberries, and toasted nuts. This morning I decided to pay homage to Country Boy, a breakfast spot in our home town, by making Southern Style Grits with Bacon.

If you’re used to making grits from a little paper packet, here’s a great secret: quick cooking grits are just as fast and easy to make as the ones in the envelope! The toppings might take a little longer to prepare, but that’s a small price to pay to have your bacon or cheese grits sans preservatives.

To put together the grits, I started by putting 1 and 1/2 cups milk and 1 and 1/2 cups water in a pot and bringing it to a boil. While that heated up, I sliced three strips of bacon into small pieces and put them in a skillet over medium-high heat.

Once the liquid came to a boil, I poured in a cup of quick cooking grits, covered the pot, and turned down the heat.

The grits only take a couple minutes to cook, so very shortly I had this:

20130629-144508.jpg
I mixed two tablespoons of butter and the bacon (with some, but not all of it’s grease :)) into the grits.

I decided to make fried eggs to serve with the grits, so I wasn’t able to serve them immediately. Grits can become somewhat gummy if they’re left to sit around, so I stirred in a little extra milk before I plated them.

20130629-144759.jpg
It was a fantastically rich breakfast, and so easy to put together! If I had a stove top with four burners, I reckon the entire meal would be ready to eat in less than 10 minutes.

Southern Style Grits with Bacon

serves 4

1 cup quick cooking grits
1 and 1/2 cups milk, plus more to taste
1 and 1/2 cups water
2 tbsp butter
3 slices bacon, cut into small pieces
salt and pepper to taste

Bring milk and water to a boil in a medium saucepan. While the liquid is heating up, sauté bacon pieces in a skillet over medium-high heat. Once boiling, add grits to the liquid, cover, and turn heat to low. After three minutes, add butter and bacon with some of its grease, to taste. Salt and pepper to taste and stir well. Serve immediately. If grits are too gummy, add more milk before serving.

Middle Eastern Tapas

When I was a kid, my mom would sometimes make what we called “appetizers for dinner.” Now that we’re all a little more worldly, I’ve put two and two together and realize that it was tapas! How sophisticated we were, without even knowing it. 😉

I had the evening free last night, so I decided to try out two new recipes. It ended up being a scaled down version of “appetizers for dinner” centered around a cuisine that I can’t get enough of: Middle Eastern. The two recipes I used as my guide were this babaganoush recipe from Ellie Krieger at Food Network and this falafel recipe from Angela at Vegangela. If you’d like to make the recipes, you can find them by following the links above!

Both recipes involved prepping quite a few ingredients, so I put the quinoa on for the falafel and threw the eggplant in the oven. While they cooked, I got all my chopping done!

IMG_1897Gotta love mise en place! It really does make cooking so much easier. The quinoa and eggplant finished around the same time. I set the quinoa to the side to cool and got to work scooping the gooey insides out of the eggplant and into the blender!

IMG_1903I made the babaganoush first and set it aside to work on the falafel. Following the advice of the recipe, I made the avocado tahini dressing and then started on the falafel patties. This version is unique in that it uses quinoa for a light, airy texture. AND it uses cilantro, my absolute favorite herb. After sauteing the garlic and onion, I mixed all the ingredients together and started frying!

IMG_1906For my readers with IC – you may be freaking out looking at all that onion on my chopping board. Well, I was too. I ended up putting in only about a half of the onion I chopped (for a total of about 1/4 of a medium onion in the falafel mix) and added some extra garlic instead. Extra garlic in place of onion is a trick I use in almost every recipe I make. If you’re super sensitive, you can just leave the onion out altogether and add as much garlic as you want!

The only other change I made to the recipe was using real eggs in place of the vegan variety.

I wanted a fresh and light drink to contrast with the rich flavors of my meal, so I blended up a few slices of watermelon. Yum! the perfect “cocktail” to go with my tapas.

IMG_1919Finally, I chopped some red pepper and carrot slices for dipping.

IMG_1916

IMG_1913

IMG_1924My tapas meal was so satisfying! I will definitely make both recipes again, using considerably less lemon in the babaganoush (Don’t you love it when a dish tastes better without an ingredient you’re supposed to avoid!?!) and ditching the avocado tahini sauce – I’ll probably go with a tzatziki type sauce next time. The good news is I have lots of cilantro left – perhaps some Vietnamese food tomorrow? 🙂

Do you ever make tapas style dishes at home? What are your favorites?